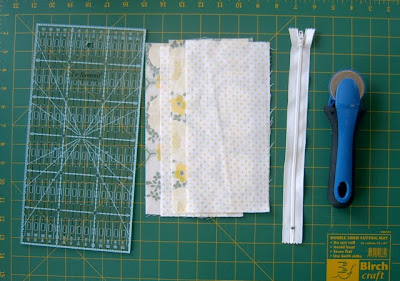
I made up a stack of zip purses and pencil cases the other day, so thought I might as well document my movements and make a little tutorial as I went - so here we go:
Find my Zip Purse Tutorial after the jump.
Zip Purse Tutorial
Finished size approx. 8" x 4" (20cm x 10cm)
Materials/Tools
2x 9x5" piece of outer fabric
2x 9x5" piece of lining fabric
10" zipper
Thread in matching colour
Sewing machine
Zip foot
Notes
1/4" seam allowance (unless otherwise stated)
Instructions
1. Cut your outer, and lining fabrics (2x each measuring 9" x 5"). You should have 4 pieces of fabric.
2. Place one piece of your outer fabric right side UP, then place your zip, teeth side DOWN, with the zip pull to your LEFT. Now place one of your lining pieces on top, right side DOWN. I am not a great pinner, but pin if you like! Using your zip foot, stitch straight along the top edge. Flip wrong sides together.
3. Next place your remaining piece of outer fabric right side UP, place zip teeth side DOWN with the zip pull to the RIGHT, then place the remaining piece of lining fabric on top, right side DOWN. Sew as before.
4. Flip wrong sides together, press flat, then top stitch about 1/8" from the edge, where the fabric and zip meet. Be sure to sew through all three layers (outer fabric, zip and lining). Repeat so both sides are stitched.
5. Next, flip fabric so you have RIGHT sides together (both outer and lining fabric facing each other). Push the zip towards the outer fabric on both sides and pin. Starting from the bottom edge of the lining, sew around the entire perimeter leaving about 2-3" opening in the lining for turning. NB. Open your zip about halfway now!
5. Trim corners and excess zipper. Turn inside out through opening. Using a chop stick, or something long and blunt, push out the corners. Press lining flat, then stitch closed. Tuck your lining into the pouch, press and you are done!
Well done! Admire your lovely handiwork.


Great tute thanks Cat! And you are a bad girl telling me about the secret op shop. I spent two hours in there this afternoon!!
ReplyDeleteHaha, Lucy and I had a little stop in there too. but I am clever and make sure I go just before school pick up so I only have limited time!
ReplyDeletebeautiful case, lovely fabric as usual! I usually do my second step the opposite to yours, because I've sewn into the zip before when it was upside down. having the teeth at the top creates a good ridge for the foot to follow. :)
ReplyDeleteLOL. Good plan. I was nearly late for school pick up because I was in there! I did buy some very cute school print fabric so I shall be making some pencil cases using your tute.
ReplyDeleteVery nice tutorial, thanks for sharing :)
ReplyDeleteJust what I was looking for My 2 little monsters need some pencil cases for thier mountains of crayons & felts :)
ReplyDeleteTHANK YOU so much for this awesome tutorial. It's so brilliant. I've been so fearful of making these purses but not now - now I want to make them up by the hundreds! Thank you so much for demystifying these!
ReplyDeleteI posted about my first attempt here http://tinyurl.com/yg596ty
Thank you!
What a fantastic clear tutorial! I'm still a bit of a beginner with the sewing machine (need to get over my zip fear!) and this will be a huge help. Thanks!
ReplyDeleteI too have zipper fear...I will have to give this a go!
ReplyDeleteTHanks heaps Cat. I tried my first 'zipper' type purse for a friend this week (blogged about it too). It had two zips and I was so scared! But came out great. Think it would have been easier with these instructions though, so I will try your method next time :)
ReplyDeleteThank you thank you thank you! I have just tried sewing my first zip with the help of this tutorial.
ReplyDeleteI will admit that I have also unpicked it straight away and am about to try again, but your tutorial has given me the courage and know how that I was seriously lacking. I know the mistakes that I made first time round and can only get better from here :-)
Thanks so much I'll have to try this, you make it look quite easy :o)
ReplyDeleteHi, just made my first one was ambitious and tried a plastic covered one- great tutorial thank you! Mine is a bit wonky......but not bad for a first effort methinks. Thank you again, this is bookmarked!
ReplyDeleteHi there, Great Tutorial Thanks! One question... Do you handsew the gap at the bottom?? Everything looked soo tidy until I got to that!! : ( Thanks
ReplyDeleteHi - I machine stitch very close to the edge, once you tuck it in you wont even notice. But you could hand stitch if you prefer. Thanks
ReplyDeleteOh thanks! Just saw this! Will give it a go - I think I know what you mean : ) haha - ps - hate hand stitching, it always turns out a bit messy! Love your stuff. Thank soo much for sharing
ReplyDelete